Photography

Shooting Prom Photos For A Friend

prom_couples_guysandgals_ospreyfield_small_2018_04_28

Prom is an exciting time for teenagers so when a friend asked me to take pictures of her son, his girlfriend (couple in center of photo) and some friends, I was happy to oblige.

Although it was a bit chilly, the group was willing to tough it out as I made suggestions and took numerous photos of the same pose over and over again (you never know when someone might have their eyes closed!).  It was unfortunate that we didn’t have more time because the overcast skies made for good, diffused light which is ideal.

My friend asked if I would make photo albums for each of the couples too.  I had fun designing some spiral-bound and a hardback album.  The spiral-bound albums were from Walgreens and, I must say, the quality was good, they made great gifts, and they were affordable.  Plus, we were able to pick them up right away.   I ordered the last album, from Photoroost, about 2 weeks ago (also affordable).  I just received notice that the album has shipped and will arrive in 4-5 business days.  I feel like it has taken forever!  Maybe it’s because the Walgreens albums were available almost instantaneously.  Also, I have since learned that Photoroost is out of Canada so that adds to the timeline.  Regardless, I can’t wait to see the album!  I hope it doesn’t disappoint…

What I learned from this photoshoot:

  1.  I will set my camera to power drive (2 back-to back photos automatically, every time I hit the button. A tip from my dad, a retired photographer.)
  2. I will be more realistic about the amount of time it will take to edit them, even though I don’t manipulate them a lot (ask any photographer, it’s time consuming!)
  3. I will consider editing the photos then add them to a thumb drive and give them to the parents to make their own albums
  4. I really like taking photos, especially when people are so willing, patient and considerate
  5. It’s time to start charging people.


Uncategorized

Crafting Leashes For My Dog

So… we adopted a dog!  We haven’t had a dog for more than 3 years and my husband was ready for one.  I, on the other hand, was getting used to the idea of living without a dog.  Well, I’m not going to deny my husband a dog if that’s what he really wants.  Besides, once you have one, you realize what you’ve been missing (and some things you could live without!).

So this my new dog:

Adopted Dog, May, 2018
My husband calls him Mazon.  I want to call him something else…

The Humane Society figures he’s 2 years old and a cross between a yellow lab and a malamute husky.  I must say… I’ve never wanted a husky.  Not because I don’t think their beautiful and amazing dogs, but because they roam (runners).  I had hoped this malamute-in-lab’s-clothing would be a lot like the labs we’ve had in the past but that’s not the case.

He has a lot of malamute physical traits like the perky ear (one is floppy!), a curled tail, the way he walks, and the way he uses his paws to interact.  He’s got quite the personality too.

  • Quirky and fun
  • High energy (we exercise him 2x and day plus playtime/training)
  • Rarely barks
  • Likes kids
  • Wishes he could sleep on our bed (I’ve given in a few times…)
  • Licks feet

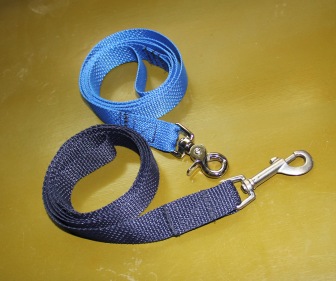
We quickly learned that he likes to chew.  Fortunately, he hasn’t chewed up the furniture or anything of significance in our house (a few shoe insoles).  He really likes to chew on leashes.  That’s why we’ve gone through 2 of them… and a harness.  Yep.  So I figured I would take advantage of my sewing skills, re-use the leash hardware, and whip up a few new leashes.

I started with leash webbing/strapping from the fabric store.  I started by cutting the hardware off of the old leashes.  Then, I ran a flame over the ends of the webbing so they wouldn’t fray.  I made a loop at each end — one for the wrist strap, the other to secure the hardware.  I used a zig-zag stitch to secure the ends, then sewed a box with an “x” in the middle for reinforcement. I must say, I’m proud of myself for recycling the old hardware vs. just throwing them away.

So now I have 2 “extra” leashes and I hope they last for quite some time.  If not, I can re-use the hardware again!

Leashes_FromScratch_2018

Now I have to decide if I want to reconstruct the harness… It has a lot of pieces and parts so it could be more of a challenge than I’m willing to take on right now.  Stay tuned…

By the way, if you have any name suggestions, just comment below.  I look forward to hearing your ideas!

Uncategorized

How to Use Alcohol Ink on Yupo Paper

I have decided to branch out and try some new craft items, like alcohol ink and Yupo paper.  You’ve heard of them?  Alcohol ink has been around for some time (or so I’ve heard through the grapevine), but I just discovered it for the first time.  Yupo paper is new and is a heavy, plastic-like cardstock.  Actually it reminds me of photography paper, from when I would go to the photo lab with my dad.  Anyway, using both the ink and paper turned out to be a lot of fun!  (If you’re interested in buying either, I bought mine from Simon Says Stamp.)

20180304_165037.jpg

I was inspired to use these products after watching a video from Jennifer McGuire.  Keep in mind, she’s in another league when it comes to designing backgrounds and greeting cards… I aspire to be more like her.  : )  Regardless, this is something anyone can try and the results will be unique and exciting.

The images above are a couple of “designs” I made using ink and Yupo.  I used 2 different combinations of ink, and the colors created very different backgrounds.  The photo on the left was taken after the product dried.  I believe the one on the right was taken while the ink was still wet.  Interesting, huh?

After creating a half dozen of these backgrounds on Yupo paper, I realized the paper could take a lot of liquid.  The ink tends to pool if a lot is added.  It will still dry in a short amount of time, but you may have pooling around the edges.  You can dab them with a paper towel if you wish.  I left them as the were, with a few exceptions, and they turned out just fine.  By the way, the ink goes a long way.  I can make a lot of backgrounds before running out of ink.

I also tried an alcohol blending solution (seen in the photo above) and rubbing alcohol (from the medicine cabinet) on top of the ink.  Both create a lot of movement and softness and I love it.  I decided that I would probably skip the alcohol blending solution, save my $$ and just use rubbing alcohol because I liked the affect just as much as when I used the solution.

20180224_195650.jpg               20180227_202717.jpg

20180224_195716.jpg      20180224_195638.jpg

As you can see, every creation turns out completely different from the rest.  You could duplicate backgrounds once you get used to using the product, which would come in handy if you needed the background for numerous projects in the same theme (ex. orange for sunsets).  I didn’t have a theme in mind so I just enjoyed trying different color combinations to see what would happen. I even added Nuvo drops to the orange background.  I don’t recommend using them because they coagulated as I work with them (didn’t flow with the ink).  Anything’s worth trying once, right?

Here’s a quick video to give you an idea of how the ink reacted with the paper and how adding the alcohol blending solution created flow and movement.  Watch how the ink begins moving shortly after it’s dropped on the paper — it really has a mind of its own!


I hope you’ll try alcohol ink and Yupo paper.  Here are some tips:

  • A little bit of ink goes a long way
  • Start with 2-3 ink colors
  • Using rubbing alcohol or alcohol blending solution will create more movement and soften the look
  • Don’t go crazy applying alcohol because it may cause pooling (a little bit goes a long way)
  • While the ink’s wet, you can blow on it to change the look (using a straw is a good option)
  • You can flick a paintbrush, dipped in alcohol, over the ink to add a different affect
  • You can add ink and/or alcohol to the image after it has dried (I did this when the finished product looked like a big swirl of 1 color and I wanted more variation.)

If you create something,  I would love to see it!  Share in the comments please.  In the meantime, I need to find creative ways to use the backgrounds on greeting cards.  Do you have any ideas?

Uncategorized

How to Make an Envelope For a Pre-Paid Coffee Card

CoffeeGiftCard_Holder_Red_BrownWrap_2018_02_03      CoffeeGiftCard_Holder_WrapOnly_2018_02_03_edited-1

After being inspired by a Jennifer McGuire video , “DIY Gift Holders & More“,  I decided to  make a giftcard holder for a coffee card.  I love how it turned out!

It’s fun and rewarding to make a simple gift into something special, and I think this giftcard holder does just that.

Gather supplies and start creating:

  1.  Cut 4, 4″ circles out of red cardstock.
  2.  Fold each circle in half and glue them together at the corners,  making a square.

TIP:  I adhere them with white glue as opposed to sticky tape.  It gives me time to move them little by little as I build the square, so they lined up and close correctly.

     3.  Option:  stamp red hearts on the flaps, like I did in the photo above.


On the inside:

  1.  Cut a piece of 3 7/8″ x 3 7/8″ white cardstock for a message/sentiment.
  2.  Add a vellum pocket for the giftcard.  I didn’t measure the vellum, just placed it on the bottom of the white square and began marking where it needed to be scored/folded.  I folded it to the back, cut off excess at the corners, and adhered it with glue dots.


Making the sleeve:

1.  Cut a piece of brown cardstock slightly wider than the coffee cup or whatever you’re using for a accent.  I cut the sleeve to 1 1/2″ wide and approximately 9 1/2″ long.

2.  I stamped coffee ring images  (optional) on the strip of brown cardstock.  I tried brown ink the first time but prefer Versamark ink.

3.  At this point you can wrap the sleeve around the envelope and glue it together (leave it a bit loose so it can freely slide off of the envelope).  I decided to create a closure using an old favorite, my BasicGrey Notch & Die tool.  I made 2 cuts that fit together to form the closure.


Add your accent:

I used a coffee cup clear stamp from… I don’t know where!  Don’t worry, there are a lot of options out there including this stamp set from Technique Tuesday.  Precious Remembrance also has a great “Coffee Love” stamp set.  If you perform a Google search, I imagine you’ll find many great options.

I stamped the coffee cup on muted green striped scrapbook paper, then again on white cardstock.  I cut out the green cup and the white “sleeve” separately.  I stamped a red heart on the sleeve, and  I added some sparkle with a Wink of Stella pen I purchased from Simon Says Stamp.  I adhered the white sleeve to the coffee cup.

I added a bit of shading on the coffee cup with a light gray marker.  Then, I added some Liquid Glass to the black coffee lid to make it look “plastic”.  I have had the Liquid Glass for MANY years and I don’t believe it’s available anymore.  Instead, you could use any type of clear glaze including Nuvo Crystal Drops (see photo).

I added 3-D pop-up squares to the back of the coffee cup before adhering to the front of the sleeve.

20180204_150618.pngFebruary 4, 2018 30143 PM MST.png

That’s it, you’re finished!  Add a pre-paid coffee card and you’re ready to share it with someone special!  Enjoy making someone’s day brighter!


20180204_134740.jpg
In this example, I used contrasting colored circles and vellum for the sleeve.


20180204_162621.jpg
Variations

Thank you for visiting my blog and trying this technique!  I hope you’ll share a photo of your coffee card envelopes.  If you would rather buy one than make it yourself, I sell them in my Etsy shop.

Uncategorized

How I Added a Decorative Diecut-Embossed Border Without a Diecut Machine

I love the look of embossing made from diecut frames, and I think diecut machines are amazing.  That being said, I don’t own a diecut machine.  So how do I make embossed borders on my cards?  I get creative!

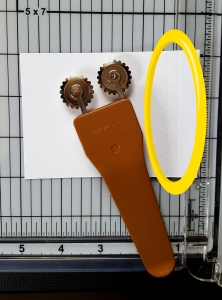
After watching videos on beautiful diecut-embossed borders, I thought “how can I do that without a diecut machine?”.  I discovered that I can use a sewing transfer wheel to make an embossed border without spending a dime.  Proud of myself…

20180128_155200

If you don’t have one of these sewing wheels, used to transfer pattern markings onto fabric, you can find them in your favorite fabric store or online.  Buy the tool with 1 wheel; you don’t need 2 wheels like mine (I don’t remember why I bought one with 2 wheels — I’ve had it for a very long time!).  NOTE:  a sewing friend would most likely let you borrow one.

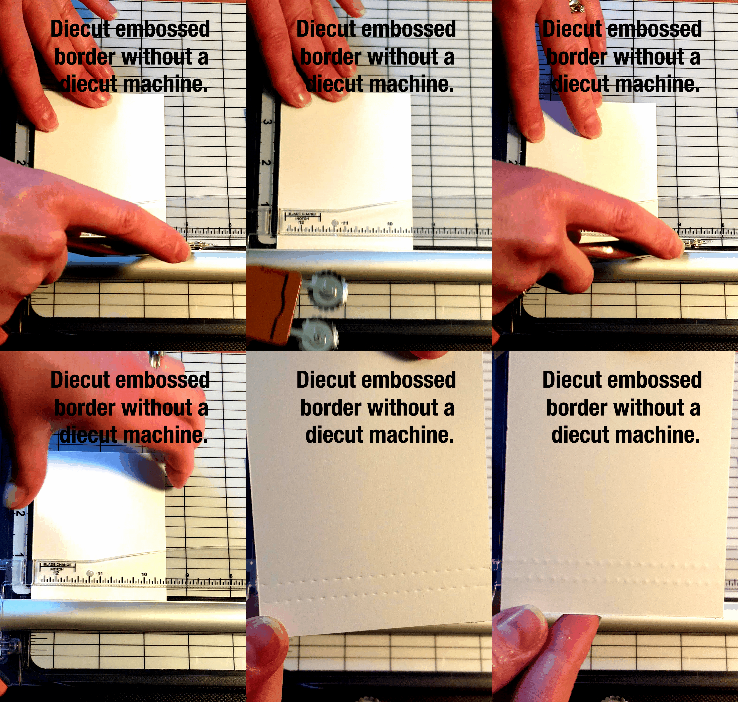
It’s simple to create the embossing, as illustrated in the following steps:

  1. Insert you paper under the cutting guide of your trimmer, as if you’re going to cut it.
  2. Place the wheel of the tool in the cutting groove/opening and roll.  You can lean the wheel against the metal guide if that makes it easier to create a straight line.

gifanime_2018.01.28_17.06.04.gif

Add detail on one end of your project (image on left), around the perimeter of the paper (image on right), or any other way you find suitable for your project.


I hope you’ll try this fun border option on your next project!  Please share the idea with your friends.  Much appreciated!

Uncategorized

Using Mini Ink Cubes to Create a Background


I saw a video recently in which Jennifer McGuire used mini ink cubes to vary the color on a stamped image.  This sparked my interest in using my mini ink cubes, which I hadn’t used in ages.

20180121_153821.jpg

I used 3 different ink pads from Bazzill (I don’t believe Bazzill even makes ink pads anymore).  You can use any mini ink pad, like cubes found on websites such as Simon Says Stamp.  Each pad is approximately 1″ x 1″.

I simply swiped the cube downward on a piece of white cardstock, stamped the sentiment, trimmed it, and added it to my card.  I used 2 colors on the sentiment you see on the card.  The darkest ink seemed too dark for the black sentiment stamped on top, so I trimmed it off.

20180125_111114_1.gif

I also swiped a bit of ink on the bottom edge of the finished card to create an accent border.  A quick and simple Valentine’s Day card for my grandfather, and I’m ahead of schedule.  Love that!  Now I need to do some baking…

20180125_153948-e1516928800288.jpg


Photography

Why I Rented a Portrait Lens

Don’t you love looking at professional portraits?  I do.  I grew up with a dad who’s a professional photographer so I thought that’s what I would do in my career.  He shot that down quicker than I could blink!  Shocked me but I learned to love it as a hobby, hence the lens rental.

I rented from www.borrowlenses.com and you can see the lens here.  I shoot with a Canon EOS and love it.  Although…. my dad and neighbor use a Nikon and I really like those too.  So I use my Canon and I rent when I want to try something new and improve my skills.

I lined up friends who were willing to stand in freezing winter temperatures so I could practice (imagine 20 degrees and light clothes…. brrrrr).  Those are good friends!  I had so much fun and I learned a lot.  I learned that it’s not as easy as my dad and professional photographer friends make it look.  I learned that it takes a lot of time; not just taking pictures but making color corrections and such.  I learned that I have a lot to learn about Photoshop too!

Most importantly, when I used the rented lens I had fun, and the time with friends was priceless.  Here are a couple of shots:

Evjen_Jerseys_12-30-17_hair_snowflecks_edited-1        Sydney_Modified_12-30-17_contrast_hue_red


This family is so sweet and funny that I couldn’t have asked for a better group to practice on.  I shot A LOT OF PICTURES!  I’m talking hundreds of pictures over 2 separate shoots!

I loved shooting the girl, Sydney, as she was very photogenic.  Her picture, on the right, is my favorite out of all of the pictures.

When I shared the photos with my dad he said I did a GREAT job (yes, he capitalized!).  Phew!  I didn’t know what he would say but it doesn’t get much better than that!

So when I loaded the photos into Photoshop, I cropped and adjusted color and light.  I also fixed a few things that didn’t look quite right.  For example, see how Sydney’s hair is messing in the first photo?  In the second photo, I fixed it using Photoshop.  So satisfying!

Evjen_Jerseys_12-30-17
Messy hair…
Evjen_Jerseys_12-30-17_hair_snowflecks_edited-1
Hair after Photoshop.


I could go on and on about how much I love shooting photos and how much I enjoyed the sessions.  I wanted to point out that it was so much more than that.

As creative people, we tend to get stuck at times.  We do the same thing over and over again and sometimes we lose our motivation and stop doing what we love.  I love to craft but that’s only a small portion of my creativity.  I’m more motivated now than I was before I rented the lens.  I’m more excited to get back to my crafts, but I will rent another lens in the Spring when it’s a bit warmer!

Greeting Cards

Shimmering Greeting Cards, How To

I love making greeting cards and enjoy adding a bit of dimension and sparkle to them.  How about you?  Recently, I saw a YouTube video (can’t remember which one) that used a clear glitter pen called “Wink of Stella Brush“.  Game changer!  I’ve used thick, glitter gel before and it’s great for a variety of applications but always seemed globby.  This Stella Brush is a fine tip brush that adds sparkle to even the smallest of areas on your design.

20171015_111528

What I love about Stella:

  • Easy to use
  • Adds shimmer
  • Adds dimension
  • Fine tip brush
  • You can write with it!

In the image below, I added a bit of Stella to the flash and lens on this camera image.  Hard to see how great it looks in this photo, but it really adds shimmer and makes the image pop.

October 15, 2017 112336 AM MDT

I just ordered it from Simon Says Stamp! and look forward to experimenting with it on more cards and Cricut projects.  I’m definitely adding some Stella to my Christmas cards!


Links:

“Wink of Stella Brush”:  https://www.simonsaysstamp.com/product/ZIG-Wink-of-Stella-GLITTER-CLEAR-Brush-Tip-Marker-025320-56877?currency=USD

Camera clear stamp:  https://altenew.com/products/capture-moments

My Etsy:  scrapbookcompleted.etsy.com